

Most industrial piping systems use different types of thread styles depending on various factors. National Pipe Thread (NPT) and British Standard Pipe (BSP) are predominant in the western hemisphere. These standards signify the types of thread styles that connect and seal the fittings. NPT and BSP fittings are typically selected depending on regional standards, industry preferences and the size of the system. 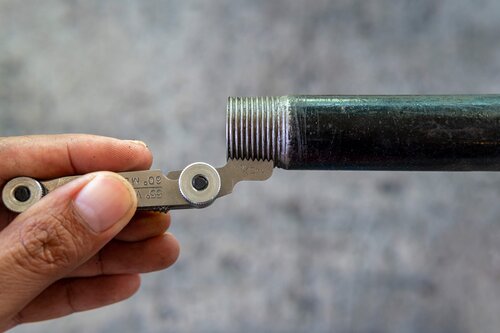
The most common hydraulic fitting thread type in the U.K. and most other commonwealth countries is BSP. In the U.S. and Canada, the most common hydraulic fitting is JIC (Joint Industry Council), though NPT is more common for piping systems.
The primary difference of the two thread styles is that NPT threads have a 60° angle and flattened peaks and valleys. Comparatively, BSP threads have a 55° angle with rounded peaks and valleys. If you’re in doubt which style you have, verify it by using a thread pitch gauge to measure the angle. Remember, the two thread styles are not compatible due to these different thread forms. Although the NPT male will fit into a BSPT fitting (T for tapered) or BSPP (P for parallel), or vice versa, they will not seal properly as the joint will become stuck causing a spiral leak along the threads.
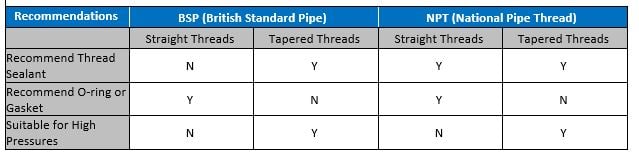
When properly installed, both NPT and BSP fittings make an excellent seal. Additionally, O-rings or thread sealant are highly recommended for many applications, including some at high pressures as shown in the table below.
Follow these steps for proper installation for BSP or NPT fittings:
1. Ensure all threads, male and female, are clean from dirt, burs and scratches 2. Apply a sealant to the male threads if appropriate (see table above)
3. Tighten the male fitting by hand until it’s finger tight in the female fitting or threaded port
4. Using a wrench, tighten fittings smaller than 1 inch approximately 1 ½ to 3 turns. For fittings between one and two inches wrench tighten approximately 1 to 2 ½ turns.
5. For shaped fittings such as elbows, tees and crosses, tighten as described in #4 and then arrange the desired orientation without loosening or over tightening the connections. Loosening or over tightening an installed fitting will dislocate any sealant that has been applied, resulting in leaks.
It’s always a good idea to consult the "Machinery's Handbook" for more detailed thread engagement instructions and additional helpful information about metalworking, with tables, formulas and more.
.png)